
Year 3 - Animation for Games
Proposal:
Abstract
During this project, I intend to focus on creating character animations for games using software such as Autodesk Maya or Blender 2.8; animations created will be exported for use within Unreal Engine (or any other specified game engine). Created animations will consist of walking, running, jumping, rolling, and ledge climbing. Animations created will be presented to the client in order to obtain feedback for any required adjustments. This project will serve to improve my skills as an animator, as this will be the first time I will be creating animations for use within a game.
I am choosing game animation as it is an area in animation I want to improve upon. This project will allow me to practice animating on the spot, as well as animating within a set amount of frames. During this project, I will also become more familiar with how to take an animation from Maya to Unreal. I intend to investigate the use of rigs in Unreal Engine, eventually testing if I can have a character rig react to uneven surfaces. I will also become more familiar with blueprinting in Unreal Engine.
My ambitions for this project are to create an environment for the character to walk around in, this environment will consist of uneven ground, such as steep hills, potholes and stairs. The environment will have these characteristics so the character rig will react to changes in the world. Before I create the environment, I will focus on animating the character rig, bringing it into Unreal, and finally blueprinting the rig so it will react to the environment.
By the end of this project, I want to have learnt more about blueprinting in Unreal as well as character animation for games.
Project Aims
My aims for this project are to create game ready animations that will seamlessly blend together in Unreal. These animations will consist of: walking, running, jumping, crawling etc.. By the end of this project, I want to have a series of game ready animations that will react to a simple environment. This environment will consist of steep hills, potholes, stairs, and climbable ledges. By the end of this project I want to be able to call myself a game animator.
Background to this project
Previously I have created multiple animations for class projects, ranging from a simple ball animation, to facial animation & lip sync tests, and 11secondclub animations. All animations I’ve created previously have all had a story element connected to them; due to this I am not used to animating on the spot for game animation. Below is a link to my animation portfolio.
Rationale
This project will serve to improve my animation abilities, as I haven’t explored animation for games before, this will be a new experience for me. This project will allow me to: practice animating on the spot; bring animations into Unreal Engine;
Methodology
My creation process for this project will consist of creating two simple game animations, a walk cycle and a run cycle. Once these animations are created, I will import them to Unreal and attempt to have the animations seamlessly blend together. Next, a test will be conducted with the rig to see if I have been able to blend the animations together. After this I will review my progress, creation process and the outcome of the experiment.
When I have completed this initial test, I will then move on to create a full range of animations, consisting of: jumping, rolling, crawling, and ledge climbing. These animations will undergo the same process as the walk and run cycle, being imported into Unreal, blended and tested. After this has been completed, I will do another review for these animations, looking back on the creation process and the final outcome.
My intention is to spend a greater amount of time on the experimental stage and then less on the final project, as I should have learned everything I need for the final stage
Expected Outcomes / Deliverables
By the end of this project, I expect to have created a range of animations that are game engine ready as well as presentable for portfolio. I expect to have a character rig moving around and reacting to a simple environment in Unreal, with animations that seamlessly blend together.
Possible Threats & Challenges
During this project, I expect to have issues with blueprinting. Prior to this project, I haven’t spent much time in Unreal Engine 4, I also haven’t experimented with blueprinting in Unreal either. In order to work around this, I can refer to online tutorials or the Unreal forums for insight into blueprinting.
Trello Page
Learning Log 14/11/19: Creating Jump Animation
I began animating on 12/11/19, using Autodesk Maya as my main animation software. Initally, I planned to animate a walk cycle but had issues creating one, due to this I began animating a jump instead. First, I tried using myself as a reference for the animation but was having trouble creating poses without an actual reference image/video. After working on this jump for approximately an hour, I wasn't pleased with how it looked, so I began again, using a YouTube video of a jump animation for games as a reference.
By using a reference video, I was able to see what the key poses should look like, as well as how the character should move. I found that most jump animations for games don't have much motion for the character bending when winding up their jump. Looking at Overwatch character jump animations, heroes such as Phara and Genji move down very slightly before their jump; whereas Heroes like Tracer and Mc Cree have a highly exaggerated jump.
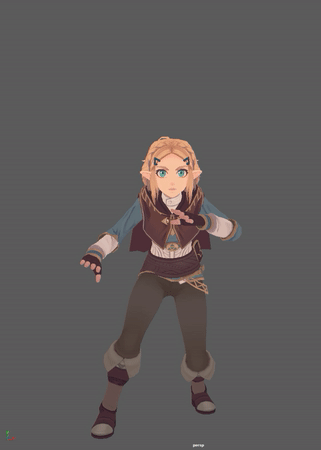
I found that while working with the Breath of the Wild 2 Zelda rig, that she didn't have any controllers for her spine, so it was difficult to exaggerate the beginning of her jump animation, as I wasn't able to have her curl before jumping. This also meant I couldn't do the same while she was landing.
After I finished animating, I sent to scene to 3DS Max, added a backdrop and some lights, then rendered a front and side view of the animation. I plan to show this animation to my tutors to obtain feedback for improvements that can be made tomorrow (15/11/19)
Jump Render 1
Learning Log 15/11/19: Jump Animation Feedback
After showing the animation to Lee and obtaining feedback, I was able to make changes to the animation to obtain a more fluid motion. Lee adjusted the curves for the jump so that Zelda began rising quickly, slowed down towards the top, and then gained speed on the decent. I discovered that I was able to use the skeleton rig in order to manipulate Zelda's back, this way she was able to curl whilst bending down to jump. This allowed for more anticipation, exaggeration, and overall a more belivable motion.
Lee also suggested that I put the rig into a pose at the start of the animation so that it doesn't go from the default pose into the motion; this makes the animation look more dynamic; he also gave advise on how the bent down pose should look.


In order to make changes to the animation, I used the curve editor to move most of the keyframes to the end of the timeline, I then began retiming the frames. I found a lot of the animation had to be redone, instead of just retimed. I had a bit of trouble with animating the landing and having Zelda seamlessly go back to her pose from the beginning of the animation. In order to fix this, I animated her pelvis and chest, moving them to the right so she would shift her weight. The left hand kept rotating into position, instead of moving back without rotating. I was able to fix this by going frame-by-frame to pose the hand in the correct position.
Zelda's feet were also slinding into place while she was getting ready to jump and land. I fixed this by making sure the position values were consistent for the first pose (pictured on the left) and the bent down pose - this made sure that her feet were locked in place.
Throughout this process I was referring back to the Overwatch jump animations that I used as reference during my previous session.
Front and side view of pose that leads into the animation.
Final Jump Render
I had to use a viewport render for the final render because when I tried to render normally, the whole animation wouldn't render. The render time was set to start at frame 0 and end at 200 but the landing was missing. I tried to extend the render to 250 frames but ran into the same issues.
Learning Log 24/11/19: Creating a Walk Cycle
Today I am going to being animating a walk cycle using the same rig used for the jump animation. I will be animating in Autodesk Maya again during this session. By the end of the session, I want to have created a walk cycle that, once complete, will be used in Unreal Engine 4. I will follow up on this learning log with another once I have obtained feedback from tutors and made improvements to the animation.
To begin, I looked on Google Images for reference images of a walk cycle and found a page from the Animators Surivial Kit on animating walks. Using this, along with another image that made note of what frame the key poses occurred on, I was able to quickly create a simple walk animation. I limited myself to 24 frames for this animation, bumping the framerate back up to 60fps once I had completed all key poses so the animation wasn't too fast.

The only issue I ran into whilst animating was that I was unable to move the keyframes on the graph editor at one point. I was able to fix this by enabling the select tool again, as I must have pressed 'Q' at some point to disable the tool.
Walk Cycle Render 1
This first render doesn't feature any secondary motion or weight shifting. In the next render I will add both secondary and weight shifting to the animation. There is an issue with one of Zelda's feet, in where the toes are animated when they shouldn't be - this will be fixed in future renders. I plan to move Zelda's arms more, having them wrap around her stomach area more, rather than the forearm having most of the movement when the arm comes towards the front.
Walk Cycle Render 2
For this render, I added some secondary to Zelda's hands so they sway with the motion from her arms, instead of staying stationary. Weight shifting in her chest and pelvis was added, during this I made sure to keep her head facing forwards so it didn't follow the rotation of her chest. I also added some bouncing to her ears, however I'm still unsure about this and may lessen the bouncing or remove it altogether. I will obtain feedback and make changes from there regarding this. Blinking was added as well during the start of the cycle, though I may move this to the middle to see how it looks when occuring later in the animation. Zelda's cape was also animated a little; I should also look at animating her hair to keep consistensy with the flowing cape.
One problem I have with this render is that when the cycle resets, the secondary motion on each hand is lost, reducing it to a snapping motion rather than a flowing motion.
In the next render, I will look at animating her head to possibly have it bob slightly; I will also look into animating her hair so it flows like the cape does. Before I continue more with this animation, I will obtain feedback for where improvements can be made.
I still feel that parts of this animation are too stiff, such as the weight shifting. I feel that I could animate Zelda's shoulders a little to give more movement to her upper body.
Learning Log 26/11/19: Walk Cycle Feedback & Touchup
During this session, I got feedback from Lee who suggested that the arms were too stiff and gave examples on how to fix the animation. He noted that the secondary animation was good but the animation sequence should change from 60 to 59 frames - this was to stop the animation having the same pose for 2 frames.
I adjusted the arm animation by making Zelda's arms straighter as opposed to curved, this allows her forearms to have more sway, as well as not be bent the whole time; motion was also added to her hair.
During my next session, I intend to take this animation into Unreal Engine 4 and attempt to create a playable character using this animation.
Learning Log 29/11/19: Importing Character into UE4, Making Them Playable
Today I am using Unreal Engine 4 to create a playable character. During this session I intend to import the animation I completed in my previous session, having it walk around in a basic environment. I will be referencing tutorials on YouTube for this task, as I am not accustomed to UE4; this session will allow me to learn more about blueprinting and mapping animations to a character.
To begin, I Googled how to create a playable character in UE4, and found a post on the Unreal Docs site about 'Setting Up a Character'. After following this for a short while, I wanted to also use a video tutorial for reference, as I was getting a little stuck with following the text-based post.
After some searching, I found the video to the right, which I was able to follow in order to create a moveable player character in UE4. The issue is, is that I want the view to be third person, not first person, which this tutorial didn't provide. I was, however, able to learn about blueprinting, setting a gamemode, and creating inputs in the project settings window.
Once I had finished creating a playable character, I wanted to be able to control Zelda, not just a blank character. Searching on YouTube, I was able to find out how to change the mesh that the player controller references. This allowed me to be able to control Zelda in Unreal, however, it didn't yeald the results I had anticipated.
I had anticipated that I would have a perfect, first person view at the least, however the camera was placed inside of Zelda's head, looking to the left. This made the first person view show the inside of the character mesh when looking up and down, as well as the chracter's hair being visible at all times.
Result:

Result of following above videos.
Next I intend to change the view to third person and have animations mapped to the character so that when I move Zelda, the walk animation will play.
Learning Log 29/11/19: Changing Camera Position & Mapping Animation to Character
After completing last sessions tasks, I was quickly able to find out how to change the point of view - by watching a video on how to change third to first person view, I did the reverse and achieved a first to thrid persona view.
Double clicking on the character blueprint and then 'Mesh (inherited)' I was able to place a camera in the scene and orientate it behind Zelda. When I placed the camera in the scene, I found out why the first person view was broken - it was because Zelda was rotated 90° to the left. I changed the oritentation of Zelda, the camera in the 'Components' tab as dragged under the character mesh, making it the child of the mesh. I then created some distance between the camera and the mesh, giving me a third person view.

Playable Character With Animations in Unreal Engine Progress 1:
Result of changing camera position.
Whilst in the character blueprints, I found how to add an animation to the mesh - this animation acts as the default animation, playing all the time when test playing. Using this allowed me to move around as Zelda with her walk animation playing.
This isn't perfect as I don't have a idle animation to blend into, so she just walks of the spot indefinately. I will look into creating an idle animation as well as using the jump animation I created previously.
I moved the camera back for more visibility after looking at Breath of the Wild and Kingdom Hearts 3 as a reference point.

One issue that I'm running into with this, is that sometimes (for seemingly no reason) my control going forwards and backwards almost completely stops - leaving me movinging at a painfully slow pace. Both left and right movement isn't effected, however.
Next, I intend to find out how to have the jump animation play when I jump in Unreal. I also want to find out how to have the walk animation play only when I move the character.
Playable Character With Animations in Unreal Engine Progress 2:
I was able to quickly find a tutorial on YouTube discribing how to have an animation set to a mouse button. Instead of the mouse button, I applied this to the 'W' key and used the same blueprints as the tutorial (appart from the 'delay' node) and this worked perfectly. Doing this played the animation when I pressed 'W' to move forward.
The only issue is that the animation will stop after 59 frames, so I either need to re-export the animation to correct the sequence - or find a way to fix this within Unreal.

Blueprint for moving forward in game. Pressing 'W' plays the walk animation.
I tried to re-export the walk animation, making sure to change the sequence to 59 frames - this didn't solve the issue. I went back into the blueprints to see if there was anything I could change there to make the animation continue instead of stop after 59 frames. I found that ticking 'Looping' at the bottom of the 'Play Animation' node would solve my issue.
Slow jump animation, animation is way off compared to the actual jump action.
After solving the walk cycle animation issues, I moved onto getting the jump animation working. I imported the animation into Unreal and used the same blueprints pictured above, replacing the 'W' node with a 'Spacebar' node instead, as Spacebar would be the button I press to jump.
After mapping the jump animation to Spacebar, I found that it lagged behind the actual jump movement quite a lot. In an attempt to fix this, I tried to speed up the animation inside of Unreal. To do this, I double clicked the animation in the Content Browser, then set the rate scale from '1' to '2' - this sped the animation up, but didn't solve my issue. After trying this, I went back into Maya to shorten the animation by removing the poses at the beginning and end of the animation, as well as shortening the sequence by a few frames.
This method yielded better results, although the jump animation is still a little off. I may have to adjust the height of the animation in the future.
When I was working to get the jump animation into Unreal, I imported the skeleton mesh as well as the character mesh. I quickly realised I wouldn't need the mesh again as it was already in the Content Browser, and when I dragged the skeleton mesh animation into the scene, it played without any issue. I deleted the second import of the mesh - this then caused all other references to the mesh to be lost. I tried right clicking in the broken references to try to reimport them - this didn't work.
I tried loading autosaves by dragging them into the Content Browser but this just gave me the same results and the initial broken file. Due to this, I had to begin the process again from the beginning. Despite having to start again, I had the blueprints set and animations imported within 15 minutes, so it was a very quick fix compared to the amount of time I first spent setting this scene up (I spent around 5 hours following tutorials and troubleshooting before running into this issue).
With the jump animation shortened in Maya, I exported again and added it back into Unreal. I found the results to be much better than the previous attempt, however, I still needed to speed the animation up using the 'Rate Scale' option. The only issues I have now are: having the jump animation not override the walk animation when it resolves (I have to press W again to resume the walk animation after jumping); creating an idle animation; and resolving some scale issue within Maya.
There is a scaling issue in Maya where the Y axis is UP - meaning the axis points towards the sky. This is fine, but when imported into Unreal, Zelda will be lying on the floor in most cases and will need to be re-adjusted in the character viewer. Her walk animation, along with her jump are orientated incorrectly, changing Z to be UP instead of Y in Maya's preferences doesn't help either. This issue can be seen in the video above, where a seperate jump animation is occuring in the floor next to the playable character. I went back into Maya and exported a T-pose for when Zelda is standing still, this is because if I have the mesh reference no animation while it's stationary, it will end up lying on the ground.
Feedback 03/12/19
Today I obtained formative feedback for my games animation which was obtained from students of the graphics and photography courses, as well as tutors (Ben: 3D tutor, and Kaite: 2D/Traditional Animation tutor).
Areas for improvement consist of: a need for greater research on animation techniques and influences of the past and present; analysis of trends/patterns in animation - to look at how trends have changed the way animation is created, and how trends will continue to change animation. I need to look back at my animations to identify areas of my own skills that need more development. Project management and pre-planning is another area I need to address. Dopes Sheets, storyboards and scheduling are needed in order to show what idea(s) I had at the beginning of the project, how these ideas were developed and built upon. While I do have a link to a Trello page on my production log, the page is private and doesn't contain any dope sheets or storyboards (as of 03/12/19)
Strong areas of my work consisted of the presentation of my work; a positive note was that improvement can be seen throughout the production log in the form of multiple renders. Technical language is used appropriately throughout the production log. Animations shown on my Wix page show a high level of skill - I just need to signpost analysis of these animations clearly and positively.
Katy (animation tutor) mentions that my fundamentals of animation are good, but that I need to look into using more real people as reference, rather than relying on using games as reference. This is because if I use games as reference all the time, I'll end up with animations that look samey without much varitey (especially for walk cycles). Katy suggested that I add more sway and exaggeration to my walk cycle - having the hips and shoulders move in a figure 8 motion, rather than stay still. One method of altering the animation is to use Photoshop to import an image sequence of a walk cycle, along with the animation I created. Applying the Puppet Warp modifier will allow me to place points on my animation pose image so I can tweak the pose in Photoshop - effectively rotoscoping the walk cycle. These modified poses can the nbe used as reference images while I animate in Maya. Katy mentioned that it would be easier to film someone walking how I want the Zelda rig to walk, rather than source a video online. If I do go down this route, I will need to film the reference multiple times, as Katy mentioned that when people are filmed, they're conscious of their movements - so I will need as much natural movement as possible. Katy also mentioned that it might be benefitial to do my animation frame-by-frame, as opposed to pose-to-pose, where the computer fills in movement for inbetween frames. In the future, I will attempt to create the inbetween frames myself to see how the final animation changes.
Tweaking Poses in Photoshop
During this session, I will be editing the walk sequence poses in Photoshop, comparing the difference between the original and edited poses. By the end of this session, I anticipate that all poses will be edited so that Zelda's shoulders and hips flow more realistically. I aim to use these edited poses as reference images for the walk cycle so that I can make changes to the animation in the future.
Firstly, I found a reference video online of a female standard walk reference and downloaded it, then used Photoshop's 'Import Video Frames to Layers' function. This allows me to select where I want the video to start and end, as well as limit the import to every x frames. This means that, for example, for every 6 frames of the video, one frame will be imported.

Next, I enabled the timeline by goin to 'Window -> Timeline' and then added a screenshot of a pose from my walk cycle animation. I put this walk cycle image to the top layer and added the 'Puppet Warp' modifier (listed under Edit -> Puppet Warp). This modifier allows me to place joints in the image and pull them, warping the parts of the image around that specific joint. For example, if a point at the shoulder is manipulated, that joint will drag that part of the image with it.


The above images show the process of altering the character's pose in Photoshop - with the left-most image being the original pose, the middle being the pose with Puppet Warp and joints applied, and the right-most being the final result (manipulated joints). In order to obtain this pose, I turned the opacity of the Zelda walk pose to 0%, and alligned the shoulder and hip joints with the reference image. This resulted in a more curved hip and shoulders.
I will apply the same method to various poses from the walk cycle I created and use them as reference when applying changes to the animation.
Learning Log 20/12/19: Creating Idle Animation
In this session I will be creating an idle animation for Zelda. I found that when moving her around in Unreal, when she stops she reverts to a t-posed state. I want to aviod this so Zelda reverts to an idle animation instead.
For Zelda's idle, I wanted her to be on guard and rather panicky - rapidly breathing whilst looking around to make sure she's safe.
I began by creating an initial pose from which I could start blocking out animation. I wanted to have her with her back arched and knees bent, with feet apart and one arm infront of her, with the other at her side. For her facial expression, I wanted to give her an attentive look, having her eyebrows lowered and eyes squinted slightly.
To the right is the first playblast of the animation blocking process.
One thing I don't like about this first blocking out is that there's too much downtime at the end of the cycle, so you can clearly see when the animation starts and ends. I also haven't added in any head movements or any personality at all - so at the moment it's rather generic.
Blockout 2

For the secondblock out, I added some movement to Zelda's arms, having them move 3 frames after she moves up and down to give some differentiation to her movements. I feel that Zelda is bobbing too quickly, I I'll try to slow the motion down a little in the next playblast, as well as adding turning motions.
Blockout 3
For the third blockout, I changed how quickly Zelda moves up and down, having her pause for 40 frames before moving again, instead of the 20 frame pause of previous blockouts.
I added movement to her head by having her look around. For the second head turn, I had her be scared and look around frantically to add some personality to the animation, rather than just have bobbing and the occasional glance.
Things that need changing in this blockout are at the end of the animation, where Zelda loops back to her starting pose, and some added arm movement when she gets startled. Widening her eyes when she's starteled is another addition to be made. I was thinking of removing the first head movement so it doesnt get too repetitive, but I think the animation is at a good point at the moment. I will keep this in mind and may adjust this in future blockouts.
Next, I plan to add the previously mentioned arm movements and eye widening when Zelda gets startled. Looking back on previous blockouts, I've noticed there isn't any shoulder movement during the bobbing. With this in mind, I plan to also add secondary motion to the shoulders; she also hasn't blinked the entire time, so I'll add some blinking too. Her fingers also need posing.
Blockout 4
As mentioned previously, I've added arm movement, blinking and eye widening to the animation. I've also added shoulder movements to her breathing motion. When Zelda gets scared, I sped up the breathing motion to add more of a sence of fright.
Overall, I'm pleased with where this animation is at the moment, with there only being minor tweaks to be made. I feel that at the end of the animation, Zelda snaps too quickly from her scared expression back to her initial pose; the second part of her first glance could last just a little longer too, maybe 10 frames or so. If possible, I want to look into adding some squash and stretch to when Zelda gets startled to add more flare to the animation.
Next I plan to test these changes out, then move on from the blocking stage.
Learning Log 21/12/19: Moving on from Blocking Idle Animation
During this session I will be moving from blocking out this animation in order to get it completed, hopefully bringing it into Unreal by the end of the day.
Firstly, I selected the spline that controls Zelda's Chest and Pelvis, deleting two keyframes for each animation in order to get a fluid up and down motion. Instead of just having her move up and down, I will add some motion to her chest to exaggerate the breathing a little.

Above: Keyframes for the Chest and Pelvis controller. Circled keyframes were deleted to obtain a smooth up and down motion.
In this iteration of the idle pose, I removed the blocking out from the chest and pelvis, and added more rotations to Zelda's chest to exaggerate her breathing. I next plan to remove blocking out from her arms and add subtle motions to her fingers.
Final Idle Animation
Whilst I was working on the arms, I had some issues with timing the secondary movement of Zelda's hands. Due to this, I switched to working on her head and face and returned to the arms at a later time. I had a lot of trouble with her right arm, as when she gets scared, it would do some rotations I didn't intend to happen. I was able to solve this by deleting the keyframes and animating her hand again.
When Zelda gets scared, I straightened her back out a little, I also added some ear twitching and a brief look to one side just before the scare occurs to build a little anticipation.
There are some things with this animation that I dislike. I downloaded an updated version of this model to use for this animation, however this version is lacking controllers for Zelda's hair and cape. Being unable to move her cape at all takes away from the animation as the cape is unable to flow as it should - the same goes for her hair. Another thing that I dislike is that the arms are too floaty in places, or movements are a little awkward. When she gets scared is a good example of her arms being floaty.
Despite these few flaws with the animation, overall I'm pleased with it. Next I plan to take this animation into Unreal and have it replace the T-pose that occurs when not moving.
Idle Animation Render
After watching the initial render I made, I noticed that one of Zelda's arms moved over too quickly when she looks to the right, so I went back and corrected this. I also fixed a small issue with her ear twitching. In the first render, her hear twitched, then started to move slowly again when it should have twitched, then stopped moving.
Idle Animation in Unreal
After I created the idle render, I exported the animation as an .fbx and imported it into my Unreal project. I searched up how to blend animations and found a series of tutorials on YouTube by Jayanam on how to do this. This method involved using Blend Spaces, something I didn't come across while looking into blending animations previously.
This method turned out to be very simple to understand and execute. Once I opened the blend space, all imported animations were off to the right, only needing to be dragged onto the center just to the right of them. Placing the idle animation at the bottom means that this animation plays when character speed is at 0 (character doesn't move), and placing the walk animation at the top means that when a desired speed is reached, the animation plays at full speed.
A max speed can be set in the blend space tab for animations, for example, if I wanted to have the walking animation play at full speed when the character speed reaches 500, I would set the Vertical Axis maximum value to 500.

Above: List of imported animations showed in the Blend Space menus.
Above: Shows me previewing the animation blend for idle to walk cycle.
After the Blend Space was complete, I had to create a blueprint for the animations to work in-game. I followed another tutorial from Jayanam on how to do this. I first had to create blueprints in the event graph tab, then in the anim graph tab. Inside the event graph, a varible was created and renamed to Speed, the variable type was then changed to Float. This variable was then dragged onto the blueprint and placed as 'Set'.
In the anim graph, the blend space was then placed onto the blueprint by right clicking and searching for it. The variable was then used by being dragged onto the 'Speed' portion of the node. The Blend Space node was then connected to the Final Animation Pose to complete the blueprint.


Once this was all done, I tried applying the blend space animations to Zelda by clicking on her in the viewport, and changing settings in the 'Animation' tab to the right to 'Use Animation Blueprint' instead of 'Use Animation Asset', this didn't work for me. I assume this is because I created this 3D playable character from scratch, adding input options in the project settings, and creating blueprints for movement previously.
Due to these issues, I created a new project file, imported all the animations, and followed the tutorials again to create the blueprints. After doing this, I was able to successfully blend Zelda's idle and walking animations. Instead of using the method of creating a 'Pawn' or 'Player Character' like I did before, I just simply selected the default UE4 rig, and swapped him out with Zelda. This keeps all of the blueprinting as well as a much better camera than I had in the previous file. In the previous file, I was unable to look around the environment without physically turning Zelda around, now I'm able to move the mouse to observe the surroundings.
The only issue is that I can't figure out how to swap out in Zelda's jump animation, so for now she doesn't have one. In my next session I will address this issue.
21/12/19: Successful Animation Blend
Conclusion
During this project, I set out to create a range of animations to be imported into Unreal Engine 4, for use of playability within the game engine. During this I achieved 3 of the proposed 5 animations: a walk cycle, jump and idle animation. I was able to learn more about how blueprinting works in Unreal Engine 4, by using animation blueprints such as Blend Spaces in order to blend the Idle animation and Walking animation. Unfortunately, I was unable to get Zelda's jump animation to work in the new file and began to focus more on my Contextual Studies practical work. Doing so stagnated my progression in this unit and meant that I didn't act upon feedback received from Katy, the animation tutor.
While I failed to act upon this feedback, and didn't update the walk cycle animation, I now know of ways to alter a character pose in Photoshop without the risk of damaging any animation in Maya. Katy's feedback also opened the possibility of rotoscoping future animations in order to obtain a more realistic animation with more weight and character behind it. I also got distracted with making another animation for this project when I should have been tweaking the walk animation. I will make sure to act upon feedback more thoroughly in the future, rather than get caught up in making more animations - I need to think in terms of quality over quantity.
Feedback obtained from my peers in the graphics and photography courses was positive, stating that the layouts of my Wix pages was clear and they liked the vast use of imagery. In a one to one with Ben, he mentioned that the presentation of my work was amazing, use of technical language in the production log is spot on; and a level of skill is evidenced through the amount of animations offered on my Wix page. He mentioned that he likes that you can see the process of the animation coming together over time in the form of multiple posts on the animation's progress.
Areas of development listed from Ben stated that more research could be done into influences and techniques from past to present - that I should analyse trends to find patterns, predicting what will happen next for the animation industry. Project management is another area for development. I need to get into the habit of creating pre-production materials such as storyboards and dope sheets in order to have a more coherent project, rather than just getting an idea and jumping in without planning it out first. I'll admit that pre-production isn't my strongest area, I rush to animating too soon and face the consequences of not pre-planning when it comes to the latter half of the project.
During this project I was unable to secure a contact within the industry, and mainly used tutors such as Katy and Lee for feedback on my animations. In future projects that require industry contact, I intend to reach out to those already in industry more, in attempts to obtain feedback from those other than my tutors. Those in industry could possibly provide a different perspective than my tutors that may help take my animations to the next level.
The animations I produced for this project are hit and miss. Each animation has massive weaknesses that are blatant. For example, the walk animation is rather generic and lacking character aside from a little bob up and down i the form of ear movement. On the other hand, this is the second time I had animated a walk cycle on the spot, so despite the lack of hip sway and character, I'm fairly ok with this animation.
In the case of the jump animation, I believe the motion is good, but the time taken to execute the jump is far too long, leading to me having to speed up the animation in-engine. Due to this however, I was able to identify and solve an issue without having to re-animate the entire motion - only having to shorted it in Maya and use tools in Unreal to achieve the end result. When I was animating this, I wasn't really thinking about taking it into Unreal, hence the height of the jump and all the loops I had to jump through just to get it right. Solving these issues was a positive experience, as it allowed me to gain knowledge of how to correct mistakes like this should they arise in the future.
Finally is the idle animation, which is my favourite of the three. This animation isn't perfect either, with some easy to spot off arm movements towards the end of the animation that annoy me every time I look at it, as well as the hand sway desyncing a few seconds into the animation. This animation is my favourite due to it making up for the lost character of the walk animation. I feel like I was able to add some nice touches that showed the character is aware of their surroundings, from her ear twitching and her glancing over to getting completely shocked and looking around frantically.
These animations are not my best work, however, due to the nature of the project and them all being on the spot animations, with more of a focus on blending them together - getting them to be functional in Unreal Engine 4, I feel I have achieved a good result. I regret not doing more on this project as after I hit a wall with Blend Spaces I somewhat shied away from the project and dedicated more attention to my Contextual Studies animations instead. This project has strengthened my understanding of blueprints in Unreal Engine 4. When I first began this project, I found blueprinting intimidating, honestly I still do somewhat, but not nearly as much as before I started this project. With the experience I've gained using Blend Spaces, I feel more confident about my animation ability when it comes to producing animations for games.