
Self Directed Project
Proposal
During this self directed project, I will be creating an animation in the same vein as those seen on the 11secondclub. I will be sourcing the audio and possibly models for my animation from the 11secondclub. I may, however, choose to use character models from other sites, such as models-resource.com, which hosts a variety of video game character models.
Audio clips I have chosen from 11secondclub consist of the April 2018, April 2017, and February 2018 competitions. Out of these clips, I will choose one to use in my animation. Before I decide on a clip, I will create a storyboard for each one - choosing based off the ideas I have for each respective audio clip.
Skills I will be using during this project will be those I have fostered throughout my second year on 3D Modelling and Animation. During the Team Project, I became more familiar with animating walk cycles and body movement. During PBR, I studied facial animation methods and produced my own facial animations consisting of lip syncs and facial expressions. Finally, during the Specialist Project Area, I continued with facial animation, experimenting with motion capture and facial rigging; taking animations into Unreal was also another focus of this project.
April 2018’s competition uses audio from Lucifer, the transcript is as follows:
Voice 1: Yet, d’you know I’m still no closer to figuring out your secret.
Voice 2: Because I don’t have a secret.
Voice 1: Well you must. One that explains how you are able to be so, you know frustratingly you.
For this clip, I had the idea of two characters in a dimly lit room, voice 1 pacing around while talking, voice 2 sitting smugly at a table.
February 2018’s competition uses audio from Mystery Science Theater 3000: The Movie, the transcript is as follows:
Voice 1: No dangerous problems or horrible mishaps in sight? Hmmm?
Voice 2: No, Tom. Everything appears nominal.
Voice 1: Ahh nominal, good, good! So I guess that means you’re not worried about what that rhythmic pounding might be…
Listening to the audio for this, I got the idea that something was following the characters, that something bad was bound to happen. I got the idea to use characters from the Dark Souls franchise. I believe because of the type of game Dark Souls is, this clip’s context would fit well when put with the Dark Souls characters/world.
Using these models, however, will mean I wont be able to do any facial animations (due to characters being in full armour), meaning I will have to express more through body movement and head bobbing. This isn’t necessarily a bad thing, while there wouldn’t be facial animations, I wouldn’t have to do any intricate lip syncing which will save time during the animation process. This will be replaced with more expressive body movements which could take up just as much time, however.
April 2017’s competition uses audio from One Rouge, the transcript is as follows:
Voice 1: Where are you taking these prisoners?
Voice 2: These are prisoners?
Voice 1: Yes, where are you taking them?
Voice 2: I am … taking them, to imprison them … in prison.
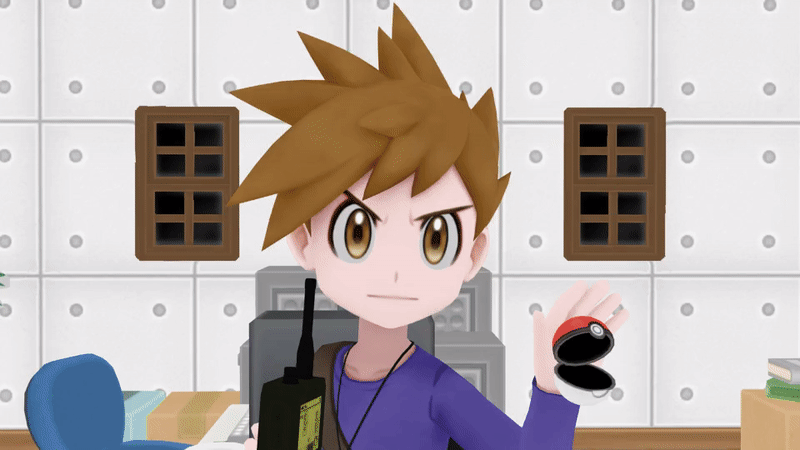
An idea I had for this audio clip was to use a trainer from the Pokemon series who is freeing some Pokemon that have been captured (put in cages) by Team Rocket. Once the trainer is about to free the captured Pokemon, a voice echos from a walkie-talkie on a nearby shelf. Startled, the trainer answers the walkie-talkie and has their partner Pokemon pick the lock on the cage as they talk.
During this project, I aspire to best my previous animations, producing an animation that will showcase my practice and knowledge of animation. Quality of these animations will be key in this project, seeing as though I’m aiming to leave this project with some of the best animations I’ve created. These animations will be 11 - 20 seconds in length (as I’m using the 11secondclub for sourcing audio), normally these animations would take ~3 days to create. As I am attempting to create higher quality animations, I’m assuming they would take ~7 days to create.
I would like to focus solely on creating one animation at a time so that I’m not jumping between mini-projects and finishing the whole module with a few below-par animations.
Animation 1 Planning (25/04/19)
I began planning for animation 1 by creating a storyboard that I will use as a reference whilst animating. Six panels were drawn in total that display the character interactions, motions, as well as lines spoken. At the time of creating this storyboard, I am setting the animation in a dimly lit room around a table. However I will look for stages online that I may potentially use during the animation that will have more impact.
Below is an image of the storyboard for the first animation. Tomorrow (26/04/19) I will being the animation process on this animation.

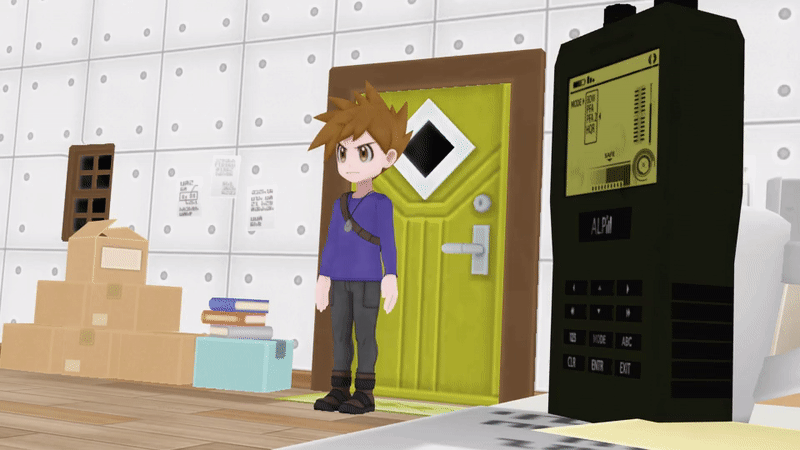
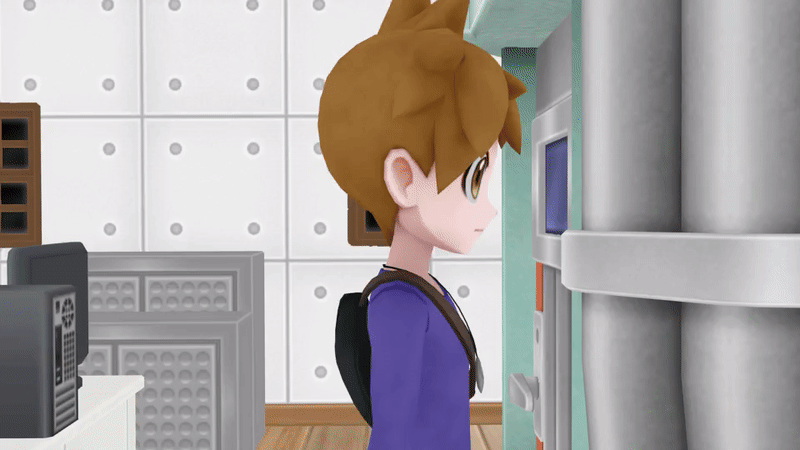
"Your Secret" Progress (26/04/19)
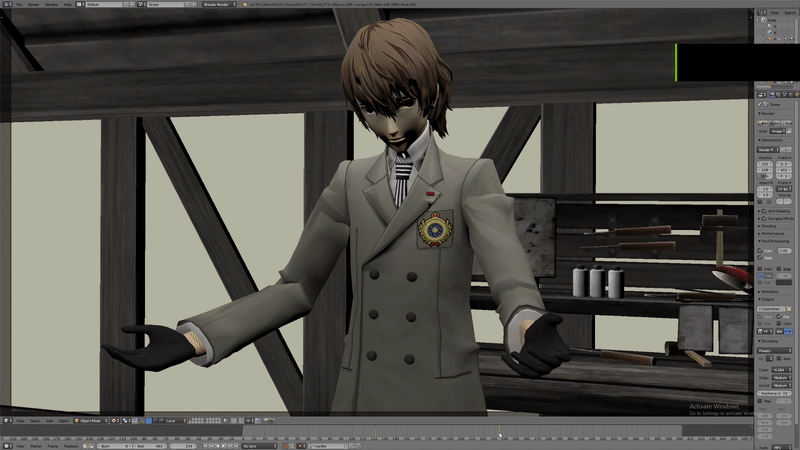
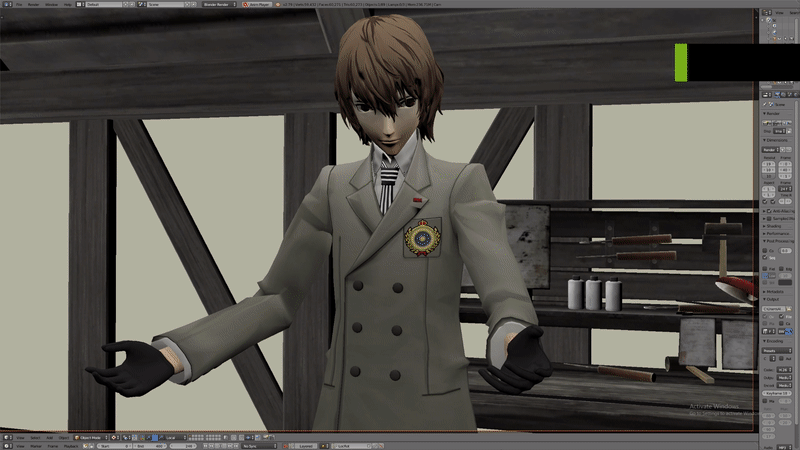
For this animation I will be using Blender. Before I started animating, I sourced the models (Persona 5: Joker and Akechi) and environment (Persona 5: Joker's Room) I planned to use from Deviantart. I chose to use there characters as throughout Persona 5, Akechi (brown hair) is investigating Joker (black hair) and his friends.
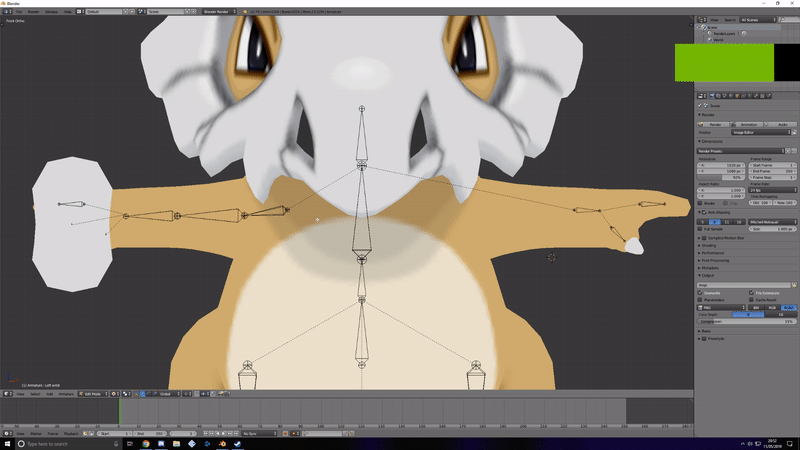
After I made the first key pose for Joker, I added an IK Constraint to the wrist bone on the hand that is holding the phone; now if I ever needed to move the arm, the phone would follow. Even though the phone does follow the movement of the arm, it's rotation doesn't change, so I need to adjust the rotation each time I want to move this arm into shot.
When I was about halfway done with the key poses, I ran into a problem with the Blender project file. This consisted of lagging when playing back the animation, or simply moving the camera. This possibly happened due to importing another character model I was going to use for a joke in the middle of the animation. Even after removing the third character model from the scene, the project was still unusable due to the immense lag. Thanks to running into similar issues before during the Specialist Project, I was able to quickly solve this issue by appending all the key frames to a fresh Blender file. Other than this, no other issues were encountered.
The image seen outside of the window is art from Persona 5 that was added in after I completed the key poses. I wanted something here to bring the presentation of the animation up a step.
Complete Key Poses (First Render)
"Your Secret" Progress cont. (26/04/19)
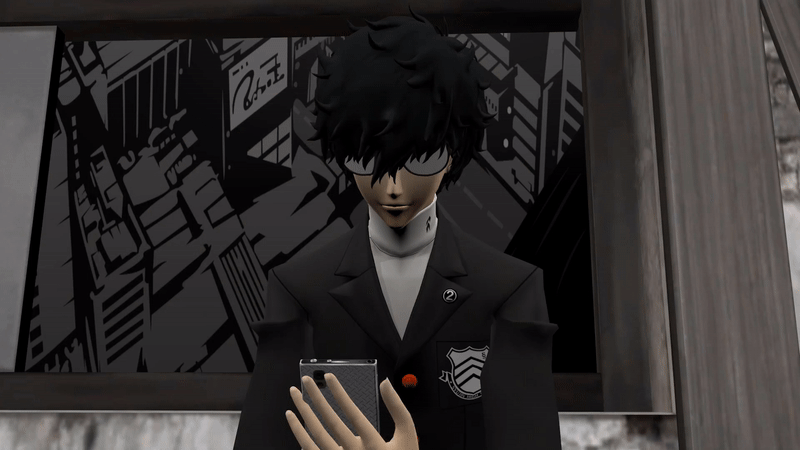
After finishing the key poses for the first render, I moved onto adding in more movement for Joker. This movement consists of head and facial animation. I had Joker look up and lean forward slightly to listen to the first line of dialogue, I also had him lower his phone.
During the establishing shot, I tried to add some movement to Joker to make it look as though he's playing a game on his phone. I wasn't satisfied with what I had done with this sequence and decided to revisit it at a later time. Whenever his arm is animated, his torso will also react, making him lean in the direction of his arm. I will need to re-position his spinal bones if I want him to only move his arm/wrist. Some leaning forward/backwards wouldn't be too bad however.
When it came to creating the lip syncing for Joker, I had some problems - the main one being: there are no shape keys for his model (the same also applies for Akechi). Due to this I had issues creating the correct mouth shapes. Fortunately, these models have well rigged faces, so I was eventually able to animate some lip syncing for Joker.
As Joker responds with "Because I don't have a secret", I wanted his head movement to match his words, so I went for a smug/condescending movement. I don't really know if I conveyed this sort of attitude with the movement, I do however like the animation; I may go back and tweak it at a later time.
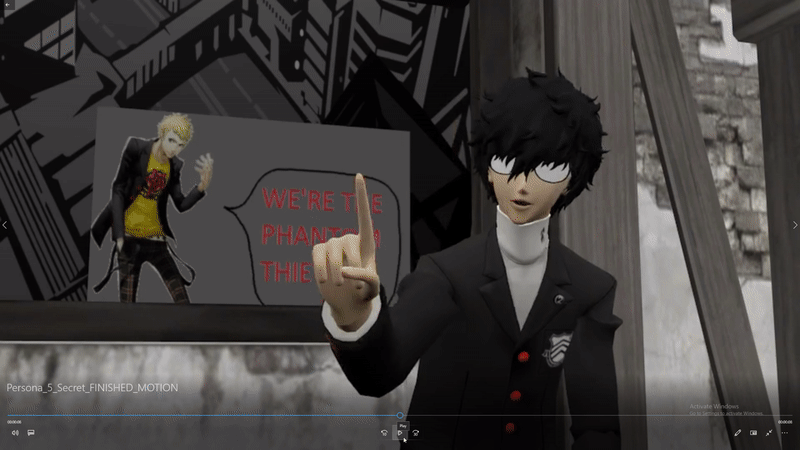
As for other changes, I spaced out the framing of Akechi's movement so he now glides across the floor. I added some secondary animation on his arms during the "Well you must." line as well as animating his head shaking. Also during the "Because I don't have a secret." line, I added an inside joke in the Persona 5 community. While I understand most people in the class possibly wont understand why it's there, it gave me a good laugh. I'll look for feedback on this and may remove it for the final render. The end of the animation now features Joker shrugging as he looks into the camera.
"Your Secret" - Second Render
"Your Secret" Progress (27/04/19)
During this session I intend to add more lip syncing to the animation and attempt to animate an initial walk for Akechi (as he approaches Joker).
Firstly, I added more lip syncing to the animation during the "Well you must." and "One that explains-" lines. Lip syncing still needs to be added for the first lines Akechi speaks as well as at the end of the animation, as he turns towards Joker. I further defined Akechi's squinting at the start of the animation by having his eyebrows move just after eyelids. I will go back to this scene and move the eyebrows just before the eyelids to see if it looks any better. I added eye movement and a slight squint to Akechi as he says "You know...", just before he turns to Joker at the end of the animation.
I tried to animate the walk for Akechi, but ran into issues doing so. The legs do not have any IK, so I'm finding it hard to have the legs planted on the ground. Everything I came to resulted in awkward movement, so I decided to revisit this at a later time. I need to remember that the entirety of his legs aren't in shot, so I can afford to not animate parts of the rig so long as everything in frame looks correct.
Akechi's hand was removed from the close-up of Joker at the end, Joker's shrug was also slowed down unintentionally and will be fixed in later renders. During the establishing shot I corrected Akechi's legs, as the one at the front was clipping through the back leg somewhat. I reanimated the start of Akechi's movement, having him slowly lean forwards to push himself off the table, then slowly bring his back upright. During this sequence, I also made sure to animate the crossed leg coming back over his other leg - rather than just moving from point A - B.
"Your Secret" - Third Render
"Your Secret" Progress (28/04/19)
During this session, I intend to add further movement to Joker and take another attempt at having Akechi walk rather than slide. I will also be adding more lip syncing to Akechi's first line of dialogue as well as adjusting any movements that may miss timing.
The first thing I wanted to do was add more life to Joker (I didn't go back to the establishing shot as I got caught up in lip syncing). When he looks up as he reacts to Akechi's dialogue, Joker now slowly moves forward slightly after the initial reaction. During Joker's: "Because I don't have a secret." I added an arm movement to have him point towards Akechi. I also had Joker lean into the point by rotating his spine and chest bones to the right, then back to the left. I believe this scene still needs some touch-ups (spine/chest bone movement secondary), however it's fine for now.
When Akechi is moving towards the camera, Joker now leans forward and then backwards slowly in order to give more life to him. I will go back to adjust this later as it does look awkward; I also don't like how Joker moves up and then into the shrug.
Secondary motion was added on Akechi's arm after he turns to Joker.
I still had no success with creating a walk animation for Akechi and will dedicate more time to this in the next sessions. During the first close-up of Akechi (start of animation) I think I could add some slight movement to his fingers, having them curl a little.
"Your Secret" - Fourth Render
"Your Secret" Progress (01/05/19)
During this session, I intend to complete the animation. I will be addressing issues I couldn't solve in previous sessions, such as: Akechi's walk, any lip syncing I missed, and adding motion to Joker during the establishing shot. I will also try adding in any small motions (eye movement, blinking) throughout the animation as well as changing around some motions (mostly Akechi's arm and wrist movements).
I firstly addressed the missing lip syncing at the start and ends of the animation. With spending quite a lot of time with these rigs, I'm used to using the bone rigs for the facial animation (which I had a lot of trouble with at the start of this project). Instead of re-posing the mouth for sounds I had already done before, I scrubbed the timeline in order to find previous poses; using the key frames from that point in the animation. Using this method saved me a lot of time while finishing lip syncing.
Next, I moved onto creating the walk for Akechi. I was still having trouble with this process, as mentioned previously. This was the part of the animation I spent the most time on trying to get correct. I'm not completely satisfied with what I arrived at. I think that the first walk looks fine, but it's the second walk i'm more concerned about. There are some off steps in the walk that I will make sure to fix at a later date.
As Akechi is walking towards the camera during the second walk, i'm finding it a little difficult to show that his legs are moving enough (as they're rotating towards and away from the camera).

This is the first walk. As only the tops of Akechi's legs are in shot, I didn't have to worry about how the out-of-frame legs looked. There is also an issue with the hand closest to the camera clips through his elbow - this will be fixed in the final render.
This is the second walk. Shown by the above GIF, it's hard to see whether Akechi's legs are moving or not; this is something I will be looking to fix at a later date. I also feel as though I should do something with his right arm (stationary arm) as he's walking. Towards the end of this GIF, the stationary arm moved upwards, back down, and then upwards again, which doesn't look good at all. Having the arm so it rises slowly may be a solution to this.
Another thing to mention about this GIF is that I added a new motion to Akechi's left arm where he rotates his hand and finishes with a clenched fist. You can also see him blink during this motion, which was also a new addition to the scene. Overall i'm pleased with how the hand motion turned out and I believe it adds more to the animation, compared to previous renders. Due to added lights it's hard to notice, but I also had Akechi's eyes motion towards Joker after he opens his eyes at the start of the gif (the eyes are not shown opening in this GIF, however).
"Your Secret" - Render 5 & 5.1
For these renders, I rendered out two versions of the animation - one without lighting and one with lighting respectively. For the animation with lighting, I tried to follow my initial ideas for this animation where the room was dimly lit. While there are parts of this render I like, I feel in some parts the lighting is too dark. For example, when Akechi says the like "Well you must.", his eyes are obscured by shadows created by the lighting.
When I added the lights to the scene, I changed the colour they emit in their settings to black, then changed the intensity to 0.250 for the light to the right, and 0.200 for the one to the left.

Lights in the scene (above).
Above. Render without shaded lighting added to the scene.
Above. Render with shaded lighting added to the scene.
"Your Secret" Progress (02/05/19)
During this session I intend to complete this animation. Throughout the process I will be addressing issues mentioned in the previous progress report. These include: issues with lighting, Akechi's walk, Akechi's hand clipping through his arm, and fixing Jokers hand clipping through his leg during the establishing shot.
The first issue I fixed was the lighting issues. For this I changed the intensity of the lights from 0.250 to 0.100. This made the shading much smoother and allowed for viewers to see Akechi's eyes after he shakes his head, which was the main issue I had with the lighting (besides other scenes being slightly too shaded). Although I wasn't able to dim the room as much as I'd hoped (as mentioned in my proposal), I believe this lighting change made the animation easier to view.


Images of before lighting change (left), and after (right).
After correcting these lighting issues I then moved onto fixing Akechi's hand clipping issues as he crosses his arms. This was easily fixed by posing Akechi's hand behind his arm every frame it clipped through. Other than this, there is nothing more to note about the process of fixing these clipping issues.

Hand clipping through arm (above).*
*There is a slight issue with this motion, in that Akechi's fingers uncurl too quickly, you can see that his fingers are completely straight right after he lowers his hand. I will go back and adjust this at the time of writing (02/05/19).
Hand no longer clips through arm (above).


Images of Joker's blazer before (left) and after (right) adjusting it's position to not clip into his legs.
After this I then fixed Joker's hand and the bottom of his blazer clipping through his legs during the establishing shot.
During this I also wanted to address the movement of his right arm (arm not holding the phone), as I wanted it to stay stationary. Due to it moving as a result of moving the IK constrained part of the rig, I was unable to have it stay completely still, even after changing the strength of the IK. Unfortunately, I had to leave this in the animation or have Joker stay completely still while looking at his phone. I will look for feedback on this.
After solving this issue it was time for me to move onto correcting the walk animation as Akechi approaches the camera. I found that the issue was that there was no motion on his legs for the final two steps. Timing between steps was also off as well as one of his feet not being planted for a step.
After playing around with the timings of his steps and adding in a pause to the right hand leg, I was able to come to a sequence I was satisfied with.
Walk sequence before re-animating. (Re-animated walk can be viewed in the complete render).
"Your Secret" Render 6
Like the last renders (5 & 5.1) I also rendered two versions this time too - one with motion blur and one without. After rendering both I then noticed other problems with the animation (mentioned above) and went back to correct them. Due to this the animation with motion blur will feature faults that the fixed one will not (due to rendering times I didn't want to render both versions out again tonight). In addition to fixing the above issue, I altered Akechi's left arm as he goes to cross it. Instead of it going down to his side and then up again - I removed the downward motion in favour of a single, smoother motion.
Overall I am pleased with the amount of progress I have made during my time working on this animation. If there is anything that still bugs me about it - it's at the very end of the animation, where Akechi turns to Joker. I feel as though the motion of his arm extending towards Joker could be much cleaner. It could be that the middle of this motion is too quick (as he brings his forearm in and then extends it). I will make sure to look for feedback on this.
Non-motion blur and fixed motions version (above).
Motion blur version, non fixed motions (above).
Animation 1 Progress - (03/05/19)
During this session I will be obtaining some audience feedback for my first animation of the Self Directed Project. With this feedback I intend to alter the animation to further bring it towards completion.

(Above) Example of the motion blur version of the animation.
I then asked Lee (tutor) for feedback on the animation. Initial impressions were that the short was well animated, especially Akechi's walk, a part of the animation I had a lot of trouble animating (as stated in previous progress reports). Another good point was that the posing was well done.
Parts of the animation that need adjusting according to Lee's feedback are Joker's motions during the establishing shot; he noted that the IK is too strong. To address this, I could try to have just Joker's hand move by weakening the IK Constraint.
Another part of the animation that was addressed was Joker's point. It was mentioned that it could be smoother, that his arm could a little extend more as well as adding some secondary animation to the motion.
I also mentioned that I wanted to edit all the renders together to show the progress between each one in a single video. Lee mentioned that this is a good idea.
I first had Geo (tutor) look at the progress of the animations. I raised a couple of my concerns with some aspects of the animation (the textured plane appearing during Joker's "Because I don't have a secret." line, and the motion blur version of the animation).
After explaining the reasoning behind the plane, Geo mentioned that it doesn't take away from the animation as it enters and exits the scene smoothly without disrupting any of the dialogue or continuity.
As for the motion blur version of the animation, Geo only noticed that there was motion blur after mentioning it was there. I explained that I wasn't sure about using this version as the blur was possibly too much with the amount of after images on the character's hands. Agreeing with this, Geo suggested that I could possibly increase the frame sampling on the motion blur to better the image (the only drawback to this is vastly longer rendering times).
(Above) Example of the IK before adjustments.
During watching back the most recent renders, I noticed that there is a camera error as the first close-up of Akechi happens. Instead of snapping to Akechi, the camera travels over to him, albeit quickly. I will fix this issue when working adjust parts of the animation brought up during feedback.
Adjusting Issues (07/05/19)
After obtaining feedback on 03/05/19 I adjusted some parts of the animation that were brought up. These consisted of Joker's bobbing as he's tapping the phone screen, and his point being too stiff as he says "Because I don't have a secret.".
The first thing I did was change the IK's strength on Joker's wrist from '1.0' to '0.6', which made his movements less erratic during the establishing and close-up shots. Making this change however meant that the rest of his movements were somewhat desynced. For example, his phone would move at a slower pace than his arm, meaning it would be lagging behind Joker's movements. It's easy to see this after Akechi says: "But you must.".
GIF of the phone lagging behind Joker's movements.
After doing this, I moved onto adjusting Joker's point to make it more smooth. To do this, I slowed down the motion of his arm a little, added secondary motion to his wrist (to have it come forward a little once his arm was extended), and removed the right rotation of his torso. Removing this torso rotation made the whole motion look less stiff; adding secondary to the wrist also helped.
(Above) Before and After of Joker's pointing motion.
Once the pointing motion was fixed, I went onto the bobbing motion as Joker is using his phone. I had some issues with this segment as his thumb ended up being desynced with the phone's motions. I found that the issue was with the phone, as it was staying in place for 5 frames before moving to react to Joker's thumb. Adjusting key frames for the phone and Joker's thumb fixed this issue.
(Above) Before and After of the establishing shot and close-up.
"Your Secret" Render 7 (07/05/19)
This is the render after feedback has been acted on. I was having some trouble with the second half of the animation (after the point), where I couldn't get the phone to match up properly with Joker's movements. To solve this, stitched together the previous render with the new animation. Seeing as though all the new animation occurred before (or during) Joker pointing, I was able to seamlessly bring the two together. This allowed me to not have to worry about re-posing or re-animating later segments of the animation.
I was unfortunately unable to produce a progress video for "Your Secret" as I had set all renders but the final renders as .MKV files (final renders were .MP4), which were not supported by my video editing software. All renders are sill view-able on this page however.
A progress video will be made for the second animation, showing all renders.
Animation 2 - "Prisoners" Planning (25/04/19)
Today I sourced audio (from the 11secondclub) for the second animation in my Self Directed Project. The script is as follows:
Voice 1: Where are you taking these prisoners?
Voice 2: These are prisoners?
Voice 1: Yes, where are you taking them?
Voice 2: I am … taking them, to imprison them … in prison.
According to the idea I had for this animation, I will be producing a storyboard within the next few days. My main focus at this time is the completion of the first animation - after this I will be focusing on the second animation.
Animation 2 - "Prisoners" Storyboard (29/04/19)
During class I was able to produce a storyboard for the second animation in my Self Directed Project. This storyboard consists of eight panels total - showing character motions, lines spoken, and interactions. Brief descriptions are also given for each panel. At the time of creating this storyboard I plan to set the animation in a storage room or warehouse. This may change depending on what models I will be able to source. Referring back to my idea for animation 2, I want to use models from the Pokemon games. As this is the case, I want to make sure the character models won't look out of place in the environment I end up choosing.

Animation 2 - "Prisoners" Progress (08/05/19)
After finishing feedback on my first animation ("Your Secret") I will now be moving onto creating key poses for the second animation. I was able to source a stage that is the closest to what I had wanted. I sourced this stage and the model(s) from models-resource.com, a website that hosts a variety of models from multiple video games.
Firstly, I imported into Blender the environment for this animation. After previously searching for an environment and coming up empty handed, I found a room from the same game as the model I chose to use. This room featured cage-like apparatus and gives off a research lab vibe. I had originally intended to use a storage room but was unable to procure an appropriate environment.

(Above) Chosen environment for the second animation "Prisoners".
While on the topic of the environment, I found some issues with the model. For instance, the computer has a strange blue texture that covers the monitor, keyboard, and part of the computer. Separating the materials and deleting this object revealed the intact models underneath. This could be a lighting element left over in the map after extracting it from the game, where there is a glow that emits from the texture's location (as it is placed over areas that would emit a blue-ish glow).


Before (left) and After (right) of the texture that was present on the computer.

Once the environment was in place, I then imported the character model I intended to use. Next, I went to the 11secondclub in order to obtain the audio for this animation, as I had forgotten to download it prior to beginning this project.
After listening to it again I noticed that it only features male voices, so the female character model I planned to use was now unusable. Due to this, I will now have to source another character model for this animation.
To the left is an image of the initial model I intended to use inside of the environment. This model's bones were visible when it was imported (unlike the next model I will address). The bones were changed to 'Stick' bones here for visibility, as the regular bones overlapped too much.
Another problem with this model is that some bones are orientated incorrectly. For example: the mouth bones are sideways - as well as the foot bones.
First character model I'd intended to use.
Sourcing a new model wasn't very difficult. I was able to find this new model on the same website as the first (link to model page: model-resource).
When I imported the new model I came across a problem - it didn't seem to have an armature (unlike the first model). I instantly thought that the model wasn't rigged and tested another model and found the same issues. In order to look into this more, I looked into the first model's hierarchy and discovered that it was indeed rigged - the bones were just incredibly small.

(Above) Model as it appears when imported - seemingly has no bones.

The same model with 'X-Ray' and 'Stick' Bones. The Armature is now visible.
Thinking I'd have to re-scale the bones, I looked to see if there was a way to have them appear above the mesh, instead of having to zoom in to find them. This lead me to finding the 'X-Ray' feature which shows the armature through the mesh. This however, still didn't solve anything as the bones were still too small to see. As a final resort, I tried changing the display of the bones from 'Octahedral ' to 'Stick', which worked perfectly, allowing me to see the bones as well as their links.
The only problem with this model is that there isn't any way to close it's eyes or position anything on the face other than the mouth. On the subject of the mouth, it appears to be rigged the same way as the previous models I used (see "Your Secret" animation logs).
While working on posing the model for creating key poses, I found that there were two different bones overlapping each other on the shoulders. In order to fix this, I found which bone controlled the shoulder's rotation and scaled it up to be easily noticeable. I was fortunate to find this, as when I was looking at the armature previously, I thought there wasn't a proper shoulder bone.

(Above, highlighted) Re-scaled shoulder bones.

Referring back to the storyboard, I noticed that I wouldn't be able to produce the establishing shot consisting of the character peeking through the door. The reason for this is because the environment isn't modelled to be viewed from the outside - meaning the door is only detailed on one side. Windows are also not detailed on the outside. Both door and windows are textured however, but I'd rather save time by creating a new shot, than arranging the outside to be presentable.
My new idea for an establishing shot it to have a shot of the character slowly walking towards the camera, looking around the room, with the camera then cutting to a slow, overhead pan of the room.
(Above) Outside of the stage. Door can't be used from the outside, windows protrude outwards.
"Prisoners" Progress (09/05/19)
Today I intend to create the key poses for the second animation. Like the first animation I will be creating key poses, and then animating the in-betweens.
The first thing I did before creating any key poses was to import the walkie talkie, when I did I applied the textures to the model. After this, I used the 'Fix Model' function (a function in the plugin 'CATS Blender Plugin') to have the textures show in the 3D view. However, doing this broke the textures on the character model. In order to diagnose the issue, I tried to remove the walkie talkie from the scene and use 'Fix Model' again, this wasn't the issue.
After right clicking and dragging on the character model, I found that the meshes were separated. I rejoined the mesh by using 'Join Mesh' > 'All' (in the CATS plugin) and tried the 'Fix Model' function again. This seemed to be the issue, as once all the meshes were joined again, the textures didn't break when 'Fix Model' was used.

(Above) Broken textures on Blue's model after using 'Fix Model' without first Joining Meshes.
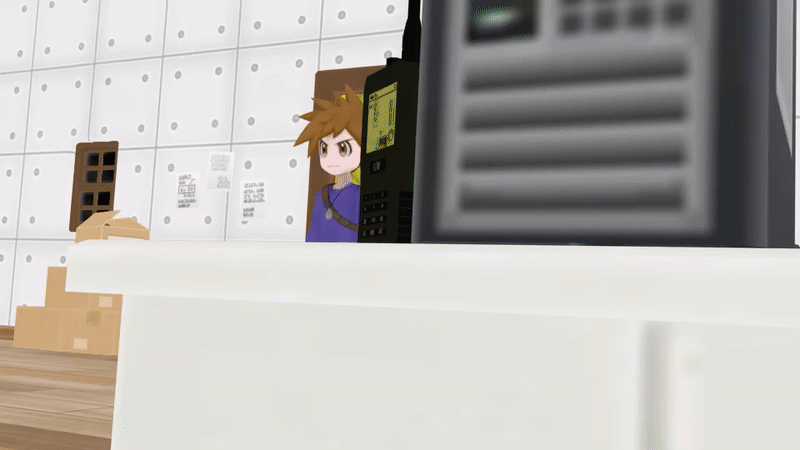
As I was key framing, I changed around the establishing shot to have it be more dynamic. The first establishing shot I created was just the character walking towards the camera, with not much of the environment being shown. With this new shot, I've planted the camera in a couple of different spots in the environment - including: on top of the computer table, and in a top corner of the room.
I made sure both shots show the image of the walkie talkie so the audience will know something that the character doesn't, in order to create a sense of mystery. I also made sure to have the character not look at the walkie talkie, so the audience should know that the character is none the wiser to it's existence.
(Above) Comparison of old and new establishing shots.
Issues During Animation
Whilst working on key posing, I ran into a major issue with the animation. Before importing a prop, I clicked 'Apply as Rest Pose', which made the current pose the rig was in it's default position (instead of say, being T-Posed).
After importing the prop, reorganising it's bones so they were visible and in the correct location, I found that the camera had been deleted. This must have happened when I was organising the bones (as there were some duplicate bones that weren't needed, bones were also tiny and in the wrong locations). I tried undoing, but found that too many changes had been made to the project for me to simply Ctrl+Z my way back.
I later found out (after organising the prop's bones) that clicking 'Apply as Rest Pose' had made the animation play out strangely, with the animation now starting from the desk (where it ended), and the character model moving backwards through the wall.
I came across a potential solution to this which was reloading a previous auto save files. Unfortunately, all auto saves were after I had done too many inputs to to back, so it was impossible to restore the save from before I had applied a new rest pose.
Due to this issue, I had to spend an additional ~2 hours reposing the character model as well as re-animating the camera. If I hadn't ran into this issue, all of the key posing would have been completed during this session.
Fortunately, I did render part of the establishing shot, so I did have a reference for recreating part of the animation. In the future I think it will be a good idea to render out portions of the animation once I've animated enough. This will mean I'll have references for reanimating if I ever run into this problem again.
"Prisoners" Render 1 - Incomplete Key Poses (09/08/19)
I was unfortunately unable to complete the key poses for this animation due to it getting late by the time I had gotten this far in the animation. This was due to having to redo whole parts of Blue's poses because of the issues mentioned above.
Next session I intend to complete the key poses for this animation. This means I will need to import other characters and props into the scene. In order to avoid the issues I encountered today, I'll look for alternative methods for bringing objects into the scene.
"Prisoners" Progress (11/05/19)
Today I intend to complete all key poses for my second animation: "Prisoners". During this session I will be importing more props and another character to be used in the animation. After the issues I ran into yesterday, I will be taking extra caution to make sure I don't make any errors with importing and fixing bones.
In order for me to avoid the same issues as yesterday, I opened another Blender file alongside the primary project file. In this file I imported the model and made any changes, then copy/pasted it into the animation file. This brought over the model, along with any changes made to the rig.
Changes made to the rig consisted of adding rotation constraints to the tail, so each bone of the tail would follow the rotation of the parent tail bone.
These constrains were added in 'Pose Mode' by first selecting the parent bone and the bone after, pressing 'Ctrl' + 'Shift' + 'C', and choosing 'Copy Rotation'. I then apply this same process to each bone on the tail. After this, I make sure to go into the 'Bone Constraints' tab and change the 'Space' to 'Local Space' <-> 'Local Space'.
Comparison of Rhydon model without and with rotation constraints on it's tail.

Settings used in the 'Bone Constraints' tab.
For the Pokemon (Magikarp) that is trapped inside of the cell, I made the same adjustments to the necessary areas of the model. These consisted of all of it's fins and whiskers.

(Above, Highlighted) Rotation constraints added to the rig.
Before using Magikarp as the trapped Pokemon, I was going to use Cubone. I had to change from using Cubone because it's left hand wasn't rigged. At first I thought the bones might be small, as each time I thought there wasn't any rigging the bones ended up being tiny. Unfortunately, this wasn't the case. I didn't want to spend any extensive amount of time trying to re-rig the model's hand and decided to find a different model to use.
In the GIF to the right, I first select the bones for Cubone's right arm and then try to do the same for Cubone's left arm. When I try to do this, nothing is selected because this arm isn't rigged.
(Above) GIF. showing that Cubone has no arm bones on it's left arm.
"Prisoners" Render 2 - Complete Key Poses (11/05/19)
Above are the complete key poses for the second animation in my Self Directed Project. The animation has a run time that doubles the first animation due to the lengthy establishment of the scene. However, I believe this doesn't take away anything from the animation as it plays into the narrative.
During the next session, I plan to add more movement to the animation, adding motion to the head, arms, accessories (that Blue wears), and more motion to distinguish that Blue is walking. For the case of Blue's walk, in the next session I will add bobbing whilst he is sliding. This can be used as a reference for when one of his feet leave the ground and when it comes back down.
"Prisoners" Animation Progress (14/05/19)
Today I intend to add more fluid motions to my animation by removing most of the pose-to-pose elements, replacing them with in-betweens. I intend to add animation to Blue's head (neck movements), add bobbing in place of his walk, and make the whole animation less choppy overall.
To begin with, I started spacing out the frames for Blue's head movements, as well as adding in more to the motions. For example, before Blue turns his head, I had him slightly turn it in the opposite direction before going through with the motion - as a way to have him wind-up for the head turn. I also added secondary motion to his head for after he's turned his head.
One thing I didn't focus on during this shot were Blue's arm movements, I also didn't add any bobbing to show he's walking.
(Above) Inbetweens added for Blue's head turning.
For when Blue is startled by the voice coming from the walkie-talkie, I animated his necklace to react to his frantic turn. I also had the arm that was on the cell lower during the turn, instead of having it lower instantly - having him turn around with the arm at his side.
I initially had a little trouble with the smaller movements when Blue leans into look through the window, as well as with his reaction. One thing I don't like about when he is startled is that the arm that rests on the cell moves with him. In the future I plan to have this arm stay in place.
(Above) Necklace reacting to Blue's movements.
After spending time animating Blue, I wanted to add more animation to Rhydon (Pokemon Blue sends out). I was able to complete Rhydon's nodding motion as well as make it's animation as it's trying to remove the door less choppy. I'm quite pleased with the nodding motion I animated for Rhydon, I believe it has a good amount of exaggeration, secondary motion, and slow-in slow-out to it.
I then went back to animate Blue pointing at the cell (before Rhydon nods). I thought it was odd that the Poke Ball Blue holds just disappears during this scene so I added it back - having it disappear once off screen. Like before I added anticipation and secondary motion to Blue's head movement. For his point, I had his arm rotate off screen and reappear to complete the pointing motion.
(Above) Rhydon's new nodding animation.
During the final shots where the cell door flies over Blue's head, I made the door's animation smoother and applied the same process to Blue's head movements as before. Magikarp was also animated to show it struggling (as it's on land, not the ideal place for a fish). When Blue notices that it's a Magikarp that was trapped in the cell, he slowly begins to lower his arm before letting it slump to his side.

After completing these animations, I then went to start lip syncing on Blue. I didn't get much of this done however, as I was having a few difficulties obtaining the correct mouth shapes/movements. Time was also getting on by this point. I was able to lip sync about two words for Blue's response to the walkie-talkie. During the next animation session tomorrow, I plan to complete his lip syncing and attempt to animate more of a competent walk.
"Prisoners" Render 3 (14/05/19)
During this session, I did want to tackle Blue's walk animation, but ended up dedicating more time to making sure his head movements were well animated. I also spent more time on other aspects of the animation, such as: Rhydon & Magikarp's movements and additional secondary movement on Blue's necklace (while not secondary movement, I also wanted timing to be correct on Blue's arm dropping in the final scene).
Overall I'm pleased with the progress made during this session. I'm quite fond of Rhydon's nodding animation and Magikarp's gasping; I believe they add the right amount of character to them. One thing to add/change for the next session would be Rhydon's walk. Since Rhydon moves so quickly towards the cell, I might find it difficult to animate a convincing walk. In order to solve this issue, I could have Rhydon move slower, or just have Rhydon jump towards the cell.
Next session I will also look more at Blue's walk, as it's something I'm having trouble with (similarly to the animation process of "Your Secret").
"Prisoners" Animation Progress (15/05/19)
Intentions for this session are to complete lip syncing for Blue, as well as attempt more at creating a walk animation for him. I will also be adjusting some smaller issues with the animation. Such as the walkie-talkie floating ahead of Blue during the second-to-last scene.
Firstly, I began animation on Blue's lip syncing. This is the part of the animation I spent the most time on; during this session. I did have a little trouble obtaining the correct mouth shapes, I was eventually able to get the animation right however. During this process, I tried shrinking the mouth a little to see if it would help with some mouth shapes. Doing this made the animation look strange so I decided not to use this method.
After completing Blue's lip syncing, I moved onto correct the walkie-talkie's movement in the second-to-last scene. In previous renders the walkie-talkie was floating ahead of Blue slightly - reaching it's final location before him. This was a quick fix as all I had to do was adjust it's key frames so it arrives at the same time as Blue.
There were also some points in the animation that the walkie-talkie would clip through Blue's fingers slightly. I also fixed the positioning of the walkie-talkie by adjusting it's rotation, as well as posing Blues hands properly during scenes where they clipped.


Before (left) and After (right) of fixing the issue of Blue's hair clipping through the cell door.
Once these changes were made, I addressed Blue's hair clipping through the cell door as he leans in to look through the window. In order to fix this, moved the door back a little so Blue's hair wouldn't clip anymore. I initially tried to re-pose Blue so he'd not lean into the door as much, but I didn't like how his posture stayed very samey.
"Prisoners" Render 4 (15/05/19)
"Prisoners" Animation Progress (16/05/19)
I intend for this to be the final session for this animation, this means I will be aiming to complete "Prisoners" today. During this session, I will be addressing walk animation issues, adding more movement to Blue and Rhydon in the last scenes of the animation, and adding more character to Blue/Rhydon overall.
Firstly, I began redoing most of the shots in the animation in order to remove Blue's legs from shot. This idea came about after discussing my troubles with animating walking with Geo.
Geo suggested that I could have the camera only show the top half of Blue so that I'd only have to animate bobbing and arm rotations. Seeing as though tomorrow (17/05/19) is the hand in date, I wouldn't have had time to do a walk animation if I was having so much trouble producing one in the first place.
Due to the lack of time left on the project, I compromised and decided to slightly alter camera angles to remove Blue's legs. Whilst creating the new establishing shots, I tried to keep them as faithful as possible to those found in previous renders. I didn't want to change the shots too drastically. I waned to make sure the walkie-talkie was still the main focus of the establishing shot.
Doing this took quite a while, however, I did find this to be an easier alternative to animating a rig's legs that aren't rigged properly (no IK to keep the feet in place while the hips move).
To the right are two examples of new shots from the beginning of the animation.


(Above) New establishing shots. Camera is more zoomed in.
(Above) Final Establishing Shot.

Rhydon's new animation during the final shot.
After this, I decided I wanted to add animation to Rhydon during the final shot of the animation, instead of it just standing there. The animation I decided to add was Rhydon looking towards Blue, then doing a double take on the Magikarp inside of the cell. After realising the Pokemon in the cell is a Magikarp, Rhydon lowers it's head and shoulders in disappointment.
I had originally wanted to have Rhydon point in disbelief at the Magikarp after realising it was the Pokemon that was trapped. This however didn't really work and just ended up looking like something more could be done to the motion.
After finalising Rhydon's animation, the rest of the session was dedicated to tweaking the camera placement and zooms. Parts of Blue's motions were also addressed, as sometimes parts of his body would rotate slowly, or parts of his fingers would clip through the walkie-talkie.
As the animation was rendering, I took the time to create a video of all the renders together (with title cards and dates for when they were first rendered). This helps compare between all of the renders in order to see the progress made with each iteration.
Once the animation was rendered, I found that the scene where Blue points towards the cell was a bit too zoomed in (you could only see Blue's hand at the bottom of the screen, as opposed to parts of his arm as well). I went back to fix this issue and re-rendered the animation.
"Prisoners"Final Render (16/05/19)
"Prisoners" All Renders (17/05/19)
The video below features numerous renders of the "Prisoners" animation. While I've titled it "All Renders", I decided to leave out the first render. Reason being that the first render wasn't a complete render due to having to go back to redo parts of the animation.
After going back and re-rendering the final render, I had deleted the text images that were in between each render. These would have told the viewer what changes were made and what date the animation was rendered. Since they were deleted they are no longer in the video; they're now shown as a red square with text reading: "Offline Media". I used YouTube's subtitle feature to add them back. Viewers just need to make sure that subtitles are enabled in order to read them.
Self Directed Project Conclusion
During this project, I had initially intended to create three animations over the course of three weeks. These consist of the two above, as well as one more featuring characters from the Dark Souls games. I was unable to produce three animations during this project due to numerous issues with the animations I had produced. However, I am pleased with the animations I have created; I believe producing these animations has improved my animation skills. I'm finding it easier to create secondary animation as well as exaggerate a character's motions.
Making use of the 11secondclub again for this project, I was able to easily produce storyboards for the two animations I produced. I didn't produce a storyboard for the third animation (that would feature Dark Souls characters), as I wanted to focus all of my attention to one animation at a time. Due to this, the only thing that exists for this third animation is the initial idea in the proposal. My method for choosing what animation to do was based on the ideas I had for the animation, so the idea I liked the most would get animated first. Really, it was being bias towards the characters I wanted to animate.
Whilst animating both of the above mini projects, I ran into numerous problems. These either resulted in me having to move over animation to a new file (by using Append), or having to re-animate whole scenes. Both of these animations saw me using the 'Append' feature to essentially 'renew' the project file. "Your Secret" (first animation) ran into a performance problem (after I imported another character model) which made the Blender project file unusable due to lag. I was able to find a work around to what I had intended to use by texturing a plane, in place of using a character model for the joke.
"Prisoners" (second animation) had an issue after I had imported props and edited them within the animation's file, instead of in a separate file. This resulted in me having to 'Append' "Prisoners" to a new project file, then re-animate all the key frames I'd produced due to incorrect rotations.
Despite these issues, I was able to solve them due to encountering similar issues in previous modules, namely the Specialist module (where I had to, for the first time, append an animation).
During this project I was able to find new solutions to issues I'd encountered. After I had imported props directly into the animation before setting them up, I found it would be better to set them up in their own file first, then copy/paste them into the animation file. This would avoid, for example, accidentally deleting the camera without realising (something that did happen during this project).
Other issues during animation (for both projects) consisted of finding the correct mouth shapes. As the rigs I downloaded used bones for the lips instead of Shape Keys, I found it hard to animate lip syncing at first. I was able to work around this by re-using previously created mouth shapes that would fit with what the character is saying. An example of this can be seen in the second animation "Prisoners"; 'Imprison' and 'Prison' are spoken - so I was able to take the mouth shape used for 'Prison' in the word 'Imprison', using it later when 'Prison' is spoken.
New issues were also encountered whilst working on this project. During setting up for "Prisoners", I encountered an issue with the character's armature where I was unable to view it's bones. Looking through the hierarchy I saw it was rigged and selected a bone, allowing me to view the bone tab. From here I was able to set the bones to 'Stick' and 'X-Ray', making the bones visible. Thanks to this, I will be able to easily check if a model is rigged or not (in Blender) by using this method.
Additional minor issues consisted of Joker's IK (in "Your Secret"), seeing as though it was too strong I lowered the influence which resulted in all of his motions being off. This resulted in his phone and thumb motion desyncing, meaning these had to be re-animated.
Spending this much time animating using Blender has allowed me to easily diagnose my issues and solve them quickly. I began using Blender over 3DS Max for my animation projects last summer (2018) , though I haven't been using Blender exclusively (during my PBR Facial animation Max/Maya was also used). Altogether over the past year, I've probably spent around 1 - 2 months of time animating in Blender. I was able to use previous animation experience and apply it when I was learning Blender. The fundamentals stay the same, the only thing that changes is the UI and keybindings. It was a huge learning curve getting used to the UI and keybind changes however.
Over the course of this project, I believe I have further improved my animation skills. I was able to use previous experience from the PBR (facial animation) and Specialist modules to execute well animated lip syncs. One thing I find a little frustrating is with the second animation. Due to the eyes not being rigged, I was unable to have the character blink or look around without turning their head. This isn't something that deterred me from finishing the animation however as this is more of an afterthought; rather than a constant issue I had while animating.
In the case of the first animation ("Your Secret"), even though I was having trouble with animating Akechi's walk, I was able to produce a result I'm satisfied with. I will admit that as Akechi walks towards the camera, it's still somewhat difficult to see if he is moving his legs. The secondary motion on his arms as he says "But you must." is stiff and can easily be improved on. It still does bother me a little that Akechi's right (our left) arm doesn't do much as he walks towards the camera. I felt like I could do a few things but ultimately settled to keep what is in the final render; as I couldn't figure out what I wanted to do with his arm. Despite this, I don't feel like what is in the final render is a bad motion, just a little lacking. Other than these issues, I don't believe there are any other outstanding issues with the first animation.
I've found, especially with the second animation ("Prisoners"), that I was able to animate satisfying secondary motions and really exaggerate character's movements (more exaggeration was used for Rhydon than anything else during this animation).
There are some shots in the final render that are a little odd, this is due to the zooming I had to use to eliminate having to animate a walk for Blue. One shot that comes to mind is as Blue walks towards the walkie-talkie, as the camera is so zoomed in it's hard to notice the walkie-talkie on the table. There also isn't much room for Blue to fit in frame during this shot. Another shot that bugs me is when Blue sends out Rhydon. I neglected to add more motion to this scene and it ended up staying similar to the first render's iteration of the scene. I also feel like Blue's arms can be a little floaty at times whilst he's walking. I've also noticed that in the final render, the shot of Blue looking into the cell is a little wonky. It looks like the camera is rotated to the right slightly. I do remember altering a shot to remove something like this, so this may have slipped back in as I was undoing (Ctrl+Z). This isn't really noticeable unless you're paying attention to the wall in the background.
Overall I'm pleased with the progress I've made regarding my animation skills, I'm also pleased with the animations I've created during this project (despite their few minor issues). Regarding future projects, I will make sure to look over the animation in more detail before deciding to render. This is to avoid any pose-to-pose animation slipping through (i.e. when Blue sends out Rhydon).